

A few years before setting up a payment option in an online website was very complex and time consuming chore. But in recent days with the introduction of payment gateways these processes become easier and a common man with basic knowledge of web can set up payment process very well.
Advantages and benefits of using payment gateway are
- Easy to set up: With the help of integration tools provided by the payment gateway service provider you can so easily set up a payment gateway on your site.
- Fraud protection: All the payment gateways are offering advanced fraud protection scheme that prevents fraud in your e-commerce transaction.
- Accept credit cards and debit cards: Customer can use their credit card or debit card for payment and this will lead to more customer satisfaction.
- ACH payment: Automatic clearing House option in payment gateway will allow banks to send money back and forth electronically.
- Recurring billing options: This option will help the customer to set up weekly or monthly payment option for a hard amount.
- Secure processing: PCI DSS standard used by the payment gateway service provider will retain the customer data safe.
- Full fledged control panel: User friendly control panel provided by the payment gateway will help you to do all the transactions very easily.
The process of setting up payment options in an e-commerce website explained below.
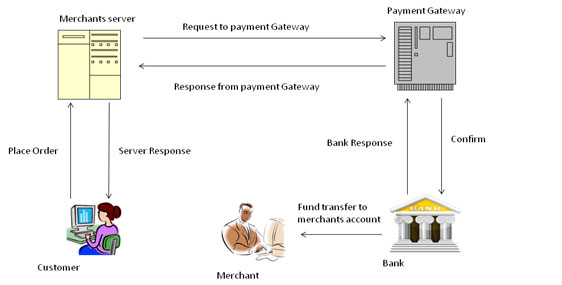
Behind the scene
A working example of a payment gateway is detailed in the figure given below.
Steps involved in setting up a payment gateway are discussed below.
1. Choosing a payment gateway can be tricky
While choosing a payment gateway following things are to be believed.
- Security
- Reliability
- Availability
- Look for ease of use
- Charges of service
- Service type offered
Some of the payment gateways available in India are
- CC Avenue
- EBS
- Paypal
- DirectPay
- Zaakpay
- Direcpay
- Payzippay
2. Register your company
Once you have chosen a payment gateway that fit according to your needs then you have to register your company/ e-commerce website for an account in the payment gateway. You may need to provide the following information.
- Registered business name
- Contact information
- Web URL
- PAN data
Once you sign up it will take more than two days to produce an active account.
3. Obtain details of the integration process.
The payment gateway service provider will give you a detailed user manual that will guide you through the entire process of payment gateway integration. Some of the items you should obtain are.
- Integration kit (Integration code in your server specific scripting language)
- Currency codes
- Country codes
- MD5 signature
- SHA signature
- Example HTML forms
- Payment method codes
- Failure codes/ Error codes
4. Prepare your server
Once you obtained above mentioned information the next task is to set up your server to integrate the payment gateway. The preparation process involves a number of different stages
- Upload integration code: Upload your server specific integration code provided by the payment gateway service provider and establish a prepayment page (Page which collect basic information like the card number expire date, etc.) And post payment page (pages that display messages after successful full or failed transaction).
- Set up gateway URL: according to the instruction given by the gateway.
5. Setup a redirect URL
Here we are sending the customer to gateway URL and you need to set up redirect codes on your prepayment page.
6. Test the integration: The control panel offered by a payment gateway service provider will help you to test the integration and fix the errors in setting up.
7. Manage transaction: The payment gateway control panel will offer you facility view, search and manage the transitions.
As an example steps involved in setting up and managing PayPal account is given below.
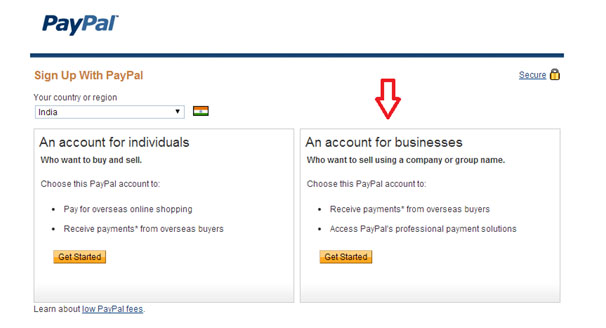
- Go to the paypal website www.paypal.com
Click on signup button top right corner

Choose the option an account for business from the sign up page , click get started.
- On the very next page fill your basic information and click continue button
- Fill the account information like user name and password in the next page.
- You have to wait two or three days for confirmation from paypal
- Once you receive verification e mail from paypal login to your payapl account add your bank details. Paypal will verify your bank details by sending two small deposit to your account. It will take two to three days
- Check your bank account for deposit from paypal , and if it is there you finished setting up account.
- Log into your PayPal account and follow the instructions to finish verifying your personal or business bank account information. PayPal will then tell you your new PayPal account set up is complete, and ask you to choose your preferred business payment method. You will also be able to set up other business-related features, such as requesting a debit MasterCard, or setting up an online shopping system.